
If you want to have a significant impact on your mood, then clean the kitchen.
Your kitchen is the heart of your home and having a clean kitchen provides you with more energy while cooking. The kitchen is the one place in your house that requires the most attention daily. You can only go so far with spot cleaning. In this comprehensive step-by-step guide, we'll teach you how to clean everything in your kitchen, from small appliances to stove burners in just 10 steps.
There's a reason the kitchen is usually the first to go when it comes to spring cleaning. Most of the items in there meet our mouths in some way, so it makes sense that we'll all want this to be the cleanest place in the house. But how "clean" is your kitchen truly after using traditional cleaners? As it turns out, not very much, unless you consider hazardous substances lingering in your air to be "clean." As you embark on your spring-cleaning journey, consider switching to natural cleaners, which get your kitchen just as clean as the top-selling brands but smell far nicer and don't off-gas toxins into your air.

Before starting cleaning don’t forget to assemble your kitchen cleaning essentials. It’s particularly important because trying to find cleansers, dishcloths, sponges, and other cleaning supplies not only wastes time, but also raises the danger of diversions, making you forget what you have been working on in the first place.
STEP 1
DECLUTTER AND DO THE DISHES
Messiness may make a kitchen appear cluttered and unclean. Before you go into the practical details, assess what is out of place and what may be discarded. Begin by removing everything that isn't in its correct place in one corner or portion of the kitchen. Recycle any papers you no longer require and discard any items that are no longer useful. Remove items that are out of place from the kitchen and place them in a container for later organization. You can return them to their proper position once your kitchen has been thoroughly cleaned.

A clean kitchen is useless if dirty items are piled in the sink, which really means you can't clean the sink or soak anything. So, wash, dry, and set aside any plate you come across. If you've a dishwasher, load it and go to the following step while it is running. Peek around your kitchen and notice how much better it appears after only the first step!
STEP 2
DUST THE ZONES

Dust the high zones, causing dirt and debris to fall to the floor and be picked up later. Start above the sink with a telescoping duster and work your way around the room, cleaning upper corners, light fixtures, and cabinet tops. Don't forget about the refrigerator's top. You're ready to go on once you're back at the sink.
STEP 3
EMPTY THE REFRIGERATOR

Empty the refrigerator by throwing anything over its expiration date. Soak soiled food jars in the sink. Wipe off the shelves from top to bottom with a paper towel or rag lathered with a nontoxic all-purpose cleanser.
STEP 4
COUNTER & CABINETS CLEANING
To clean the countertops, remove everything from them so that they are completely empty. Wipe off the counters and backsplash with an all-purpose cleanser and a microfiber cloth, paying extra attention to the edges and corners.

Clean all cabinets and any other items on the walls, including a microwave that is installed. Allow the microwave interior to sit for two minutes after spraying it with all-purpose cleaning. Wipe off the exterior with a moist, soapy cloth. (To remove fingerprints off stainless steel, use a cloth dampened with diluted white vinegar instead of soapy water.) Next, as you round the room, clean the doors and pulls of the upper cabinets, as well as anything else (frames, hooks, vent grates) you come across. If you have a backsplash, wipe it down with a clean, moist, soapy cloth.
STEP 5
CLEAN THE SMALL AND LARGE APPLIANCE
Always start cleaning with the inside of small appliances. First, clean the crumbs from your coffee maker and toaster. To eliminate mineral residue, run a vinegar cycle through your coffeemaker. You don't need to spend much time cleaning the outside of appliances because steam will handle most of the work.

It's a promising idea to spend some time removing any caked-on food. Clean the exteriors of the appliances lightly with a microfiber cloth and a vinegar-and-hot-water solution. If you have stainless steel appliances, use an all-purpose cleaner or a combination of dish soap and water instead of vinegar, which can strip the finish.
STEP 6
MICROWAVE & STOVETOP
In this step, allow the microwave interior to sit for two minutes after spraying it with all-purpose cleaning. After 2 minutes, using a dry cloth, wipe the solution from the inside out. It's fine if some crumbs fall on the floor or the stove.

If you have a stovetop, allow the all-purpose cleanser to sit on the stovetop for the next few minutes. For tough stains, use a non-scratching powdered scrub. After a few minutes wipe the cleanser with dry cloth.
STEP 7
SCRUB THE SINK
Now is the moment to give your sink the care they deserve. If you haven't already, take a knife and gently remove any particles or sludge that may have become caught between the counter and the sink. It's easier than you think to clean your sink with hot steam.
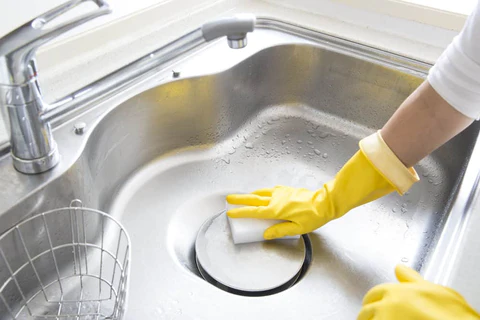
Wipe off the surface gently with a sponge, then use a scrubbing cleanser with a non-scratch scrubbing pad to remove water and mineral stains and shine it. If you have a waste disposal, use lemon, lime, or other citrus fruit juice to keep it smelling fresh.
STEP 8
EMPTY THE TRASH

Take out the trash can, alternatively, the recycle bin or the compost bin. Before reinstalling the bag, gently wipe the inside of the can and the inner of the top with a cleaning wipe.
STEP 9
CREATE A SPOON JAR

Spoon rests are frequently more trouble than they are worth; instead, fill a glass or jar halfway with warm water and use it to temporarily store your tasting and stirring spoons. As another advantage, because it's vertical, it takes up less counterspace and can easily be hidden under a counter.
STEP 10
GIVE YOUR FLOOR NEW LIFE
Sweep and mop or vacuum the floor. Get all the way up to the baseboards and underneath the cabinets, where crumbs can gather. To reach the areas along the walls, pull away appliances.

Start with a mop (or a steam cleaner, if you have one) and a bucket, starting from the furthest corner from the room's doorway. Dump the unclean water into the trash or flush it down the toilet.
RESTORE ORDER & ADMIRE YOURSELF
Now since your kitchen is spotless from top to bottom, you may replace or restore the clean rugs and restock the drawers with new dish towels.
A clean environment not only improves safety in the kitchen, but it also improves your opportunity to appreciate the activity.

Just add noodles and fun music and seat yourself on the couch. Admire your challenging work because you’re done!


